During a customer disruption, you need to know who needs an update, which message is approved, and when the next notice is due. This Excel workbook gives your managed service provider (MSP) team a structured log for coordinating those communications.
Enter each notice and its timestamps manually, then use calculated due times, queue statuses, and lateness to decide what needs attention. The workbook supports a manual communication workflow; it does not send messages or confirm delivery.
When to use this workbook
- Keep each audience, approved message, and recorded send time together for incident handoffs.
- Prioritize notices using calculated due times and a manually refreshed review timestamp.
- Identify missing approval details and inconsistent send records before relying on the queue.
- Review recorded notification timeliness against editable elapsed-minute planning targets.
What is in the file
How to use the workbook
1. Prepare the settings and remove example inputs
On Settings, replace As Of (UTC; required) with your current review timestamp. Confirm Initial Target Minutes, Update Target Minutes, and Due Soon Minutes. The starting values are 15, 60, and 10 minutes. All ten populated records are fictional examples; clear or replace their manual inputs before operational use, preserving the formulas.
2. Add one record for each notice
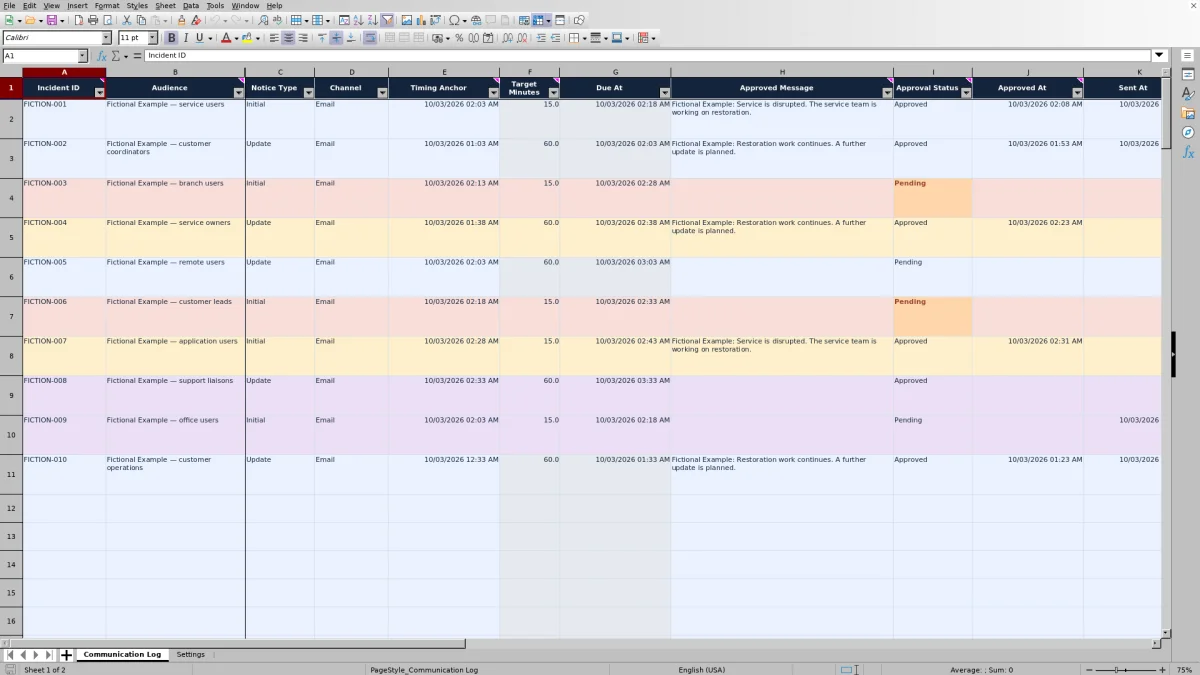
On Communication Log, enter Incident ID, Audience, Notice Type, Channel, Timing Anchor, and Approval Status. Use a separate row for each audience and successive update. For an Initial notice, the anchor is when the disruption became known. For an Update, manually copy the preceding notification’s actual send time.
3. Review data and approval before delivery
Refresh As Of, resolve rows marked Needs review, and then filter Queue Status for Due or overdue and Due soon. Check Approval Status separately. Record the authorized text in Approved Message and the approval timestamp in Approved At; a due notice still needs approval before you arrange delivery.
4. Record the actual send and plan the next update
After sending through your normal communication channel, enter the actual Sent At timestamp in UTC. Review Queue Status and Actual Minutes Late. Add the next update as a new row rather than overwriting the completed notice, then use the counts on Settings to review the queue.
Keep each audience and update as a separate notice
A disruption can require different messages for service users, customer coordinators, and service owners. Use one row per notice so each audience has its own message, approval record, due time, and actual send time. Repeat the Incident ID across related rows to keep those notices associated with the same disruption.
Separate rows also matter when audiences receive updates at different times. An update’s Timing Anchor comes from the preceding notification’s actual send time, copied manually. Choose the preceding notice relevant to that audience rather than assuming every audience follows the same schedule.
When another update is needed, add a new record. Overwriting the previous message or Sent At value removes the earlier notice from the working log and changes what the summary represents. The workbook does not create successive notices or link their anchors automatically.
Set timing targets without confusing them with commitments
Due At is calculated by adding Target Minutes to Timing Anchor. Initial notices use Initial Target Minutes from Settings; Update notices use Update Target Minutes. These are elapsed minutes, not business hours, so the calculation does not pause overnight, on weekends, or on holidays.
The supplied 15-minute initial target and 60-minute update target are editable planning examples, not contractual defaults. Before using them, check the customer’s communication commitments and decide whether one shared pair of targets is appropriate. The workbook does not select different targets by customer, audience, or channel. Initial and update targets accept whole minutes from 1 through 10,080; Due Soon Minutes accepts 0 through 10,080.
Changing either target recalculates existing due times and lateness, including already-sent notices. Preserve a separately named copy before changing assumptions if you need to retain an earlier review basis. Otherwise, a historical notice may appear on time or late under a target that was not used when it was sent.
Use the queue to decide the next action, not to authorize a send
Queue Status first checks whether Data Check is OK. Records with identified input problems show Needs review instead of a timing status. Resolve those records first so incomplete information does not disappear behind an apparently comfortable due time.
For an unsent record that passes the checks, Due At at or before As Of produces Due or overdue. A later due time within the configured warning window produces Due soon; anything further out is Scheduled. These statuses depend on the manually entered As Of time, not a continuously advancing clock. Refresh Settings before each queue review. The review requirement message checks that a positive numeric As Of exists, but it cannot establish that the timestamp is fresh.
Timing and approval are separate decisions. A Pending or Rejected unsent notice can pass Data Check and appear in the timing queue. Check Approval Status before acting: obtain approval for an unapproved notice, or arrange delivery for an approved one. Entering Approved records your decision; the workbook does not obtain authorization or verify the message’s accuracy.
Example: an initial notice followed by a late update
Assume the settings remain at 15 minutes for Initial notices, 60 minutes for Update notices, and a 10-minute due-soon window. Use the following illustrative inputs, all on October 3, 2026, in UTC:
- Initial notice: Incident ID OUT-104, Audience customer coordinators, Channel Email, Timing Anchor 9:00 AM, Approval Status Approved, Approved Message containing the authorized outage text, Approved At 9:08 AM, and Sent At 9:12 AM.
- Next update: the same incident, audience, and channel; Notice Type Update; Timing Anchor 9:12 AM copied from the initial send; Approval Status Pending; and Sent At blank. Set As Of to 10:05 AM for this review.
The initial notice is due at 9:15 AM. Its 9:12 AM send is on time, with Actual Minutes Late equal to 0. The update is due at 10:12 AM: 60 elapsed minutes after the preceding send. At the 10:05 AM review, it is seven minutes away and therefore Due soon. That is a prompt to obtain approval, not permission to send the Pending message.
Suppose you then record the update’s approved text, change Approval Status to Approved, enter Approved At as 10:10 AM, and record its actual send at 10:18 AM. With valid inputs, the update becomes Sent late and Actual Minutes Late is 6. Review the six-minute miss against the planning target; it does not by itself explain the cause or establish a contractual breach.
Troubleshooting missing inputs, approval checks, and blank results
Use Data Check to identify the first problem flagged for a row. Correct it and review the row again, because another issue may become visible afterward.
- Missing input: check Incident ID, Audience, Notice Type, Channel, Timing Anchor, and Approval Status. Target Minutes must also be available from the notice type. Use the existing Initial or Update dropdown values rather than renaming them.
- Incomplete approval: a row marked Approved needs both Approved Message and Approved At. Enter the actual authorized content and timestamp rather than placeholders.
- Check sent record: a populated Sent At requires Approved status, an approved message, and an approval timestamp. It must not precede Approved At or Timing Anchor. Verify the underlying record rather than changing timestamps merely to clear the warning.
A blank Due At can mean the incident, anchor, or applicable target is missing. A blank Actual Minutes Late is not evidence of an on-time send: it remains blank when the row fails Data Check, Sent At is absent, or Due At is unavailable. For a valid sent notice, 0 means it was sent at or before the due time; early sends are not shown as negative lateness.
Enter full Excel date-time values rather than text or time-only entries. Use UTC consistently and include the date for notices that cross midnight. Data Check covers specific completeness and sequence conditions, not every possible factual error; an OK result does not prove that the audience, message, or timestamp is correct.
Interpret the summary as notice performance, not incident performance
Settings counts six Queue Status results: Due or overdue, Due soon, Scheduled, Needs review, Sent on time, and Sent late. These are notification counts, not unique incident counts. One disruption with several audiences and updates can account for many rows.
On-Time Share of Valid Sent Notices divides Sent on time by the combined Sent on time and Sent late counts. For example, eight valid on-time notices and two valid late notices produce 80%. Pending notices and records in Needs review are outside that denominator. A favorable percentage should therefore be read alongside the open queue and review count, not as evidence that every required communication happened.
The share is blank when there are no valid sent notices; it is not 0%. The summary also cannot measure restoration time, customer receipt, or an unlogged notice. Keep supporting delivery evidence in your normal incident records, and remove the fictional examples before treating these figures as operational results.
Comparison: this workbook or a blank spreadsheet
A blank spreadsheet can work for a small, informal communication register. This workbook is useful when you want consistent notice fields and calculated timing checks without building them yourself. Both approaches still depend on disciplined manual recording.
| Method | Setup and structure | Timing review | Approval and delivery evidence | Ongoing work |
|---|---|---|---|---|
| This Excel workbook | Prepared fields, dropdowns, and formulas for 100 notice rows. | Calculates due times, queue status, lateness, and a valid-sent on-time share. | Records message text, status, approval time, and send time; checks selected inconsistencies. | You refresh As Of, enter actual events, and create each next update manually. |
| Blank spreadsheet | You choose and maintain the columns and entry conventions. | You review timestamps manually or build your own calculations. | You design the approval and send records and any checks you need. | You maintain both the record and any formulas or controls you add. |
Choose the prepared workbook when its shared Initial and Update targets fit your process. A custom sheet may fit better when your notice structure is materially different, but you must design and test its checks. If you need automated sending, delivery confirmation, or controlled approval history, evaluate a communication or ticketing workflow for those requirements rather than assuming this workbook provides them.
Frequently asked questions
Does the workbook send emails or publish status page updates?
No. Email, Status page, and Phone are channel labels for manual records. You deliver the notice through your normal tools and enter Sent At yourself. The workbook does not confirm receipt or create the next update automatically.
How many notices can I record in the prepared file?
The prepared log covers 100 notice rows, from rows 2 through 101, including the ten fictional example records. Formulas, validation ranges, filters, and summary counts are configured for that range. Do not assume entries below row 101 will be checked or counted; extend and verify those ranges before relying on additional rows.
Which cells should I edit?
Pale blue cells are editable inputs; gray cells contain formulas. Enter notice details and timestamps in the input fields, and adjust the timing assumptions on Settings. Preserve calculated columns such as Due At and Queue Status. Treat the dropdown lists as controlled vocabulary, not workflow definitions you can rename without affecting calculations.
Can I use local time instead of UTC?
The operating guidance calls for UTC for As Of, Timing Anchor, Approved At, and Sent At. Convert local timestamps to UTC before entering them, and include the full date. The workbook does not provide a time-zone conversion function; mixing local time and UTC can make due times and lateness misleading.
Does the log identify who approved a message?
It provides Approved Message, Approval Status, and Approved At, but no dedicated approver-name field. Retain approval identity and supporting evidence in your normal incident records. The workbook’s approval checks assess entered fields and selected timestamp relationships; they are not an approval audit trail.
About the authors

Tessa WhitlockClient & service operations
More about this area of the library →
Nathan CalderwoodService economics & planning
More about this area of the library →